No, all starter relays are not the same. Depending on the make and model of the vehicle, the starter relay will be different. There are four main types of starter relays: mechanical, solid state, electronic, and computer controlled.
A bad relay can prevent a car from starting by preventing the flow of electricity to the starter motor. The starter motor needs a large amount of electricity to turn the engine over, and if the relay is not functioning properly, the starter motor will not receive the necessary power and the car will not start.
A starter relay is used to provide power to the starter motor. It is usually located in the engine compartment, near the battery. If your starter relay is not working, you may need to replace it.
To test a starter relay without a multimeter, first disconnect the negative battery cable. Next, remove the starter relay from the vehicle. Finally, using a test light, check for power at the relay's large terminal. If the test light illuminates, the relay is good. If the test light does not illuminate, the relay is bad and needs to be replaced.


4.8/5
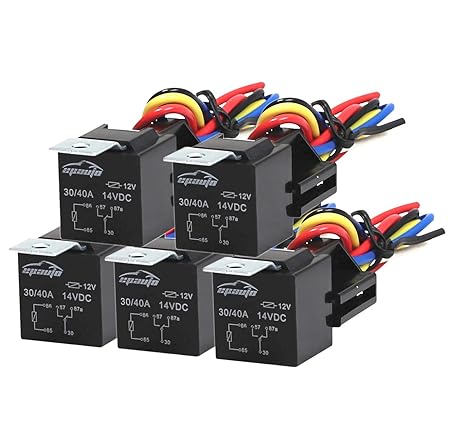
40A/30A high switching capability.
Heavy-duty impact molded relay socket with 5 WIRES。White (common), Black (normally closed), and Yellow (normally open).
Safety UL Flame retardant 9" wires for the main contact.
Package Include: 5 relays + 5 relay sockets with wires.

$234
Let me try to explain a relay for those of you who might not grasp it:A relay is connected to the positive and negative terminals of your batteries (or only to ground), and a further wire from the relay is connected to a switch. Most frequently, this switch is your ignition, but it also could be a secondary toggle switch that you install for a special system. The positive and negative output wires that go to your accessory are the final two wires.Relays are designed so that a very narrow gauge wire for the switched circuit (often off the ignition) can be run over a long distance to the relay. Because large gauge wire is more expensive and it is unnecessary to run 20 feet of 8 gauge wire, the power lines can be kept short. Since my ATV has so many extras, I got these primarily for it but for a few other projects as well. I wanted them to just turn on when the ignition is turned on because it has so many accessories. I connected the relay to the ignition and a fuse block after that. Each relay has a wiring diagram, making wiring a breeze. If you're still confused, there are plenty of simple-to-follow photos online. The gauge of the wire that is joined to the relay is a common question. Fear not; the short run and its ability to withstand 40 amps continuously were both confirmed by the NEC book. With a 5 pack, these are excellent quality and you can't go wrong. These are quite affordable and of excellent quality. Simply purchase them if you want to keep your battery alive. I sincerely hope that you found my review to be useful; if so, do select "yes" below. Thanks!
4.8/5
Safety UL Listed 6" wires with pigtail leads for the main contact.
Package Include: 4 relays + 4 relay sockets with wires.
Heavy-duty impact molded relay socket with 5 WIRES。White (common), Black (normally closed), and Yellow (normally open).
40A/30A high switching capability.
$234


Let me try to explain a relay for those of you who might not grasp it:A relay is connected to the positive and negative terminals of your batteries (or only to ground), and a further wire from the relay is connected to a switch. Most frequently, this switch is your ignition, but it also could be a secondary toggle switch that you install for a special system. The positive and negative output wires that go to your accessory are the final two wires.Relays are designed so that a very narrow gauge wire for the switched circuit (often off the ignition) can be run over a long distance to the relay. Because large gauge wire is more expensive and it is unnecessary to run 20 feet of 8 gauge wire, the power lines can be kept short. Since my ATV has so many extras, I got these primarily for it but for a few other projects as well. I wanted them to just turn on when the ignition is turned on because it has so many accessories. I connected the relay to the ignition and a fuse block after that. Each relay has a wiring diagram, making wiring a breeze. If you're still confused, there are plenty of simple-to-follow photos online. The gauge of the wire that is joined to the relay is a common question. Fear not; the short run and its ability to withstand 40 amps continuously were both confirmed by the NEC book. With a 5 pack, these are excellent quality and you can't go wrong. These are quite affordable and of excellent quality. Simply purchase them if you want to keep your battery alive. I sincerely hope that you found my review to be useful; if so, do select "yes" below. Thanks!


4.8/5
Interlocking design relay socket harness base for easy cable management & organization.
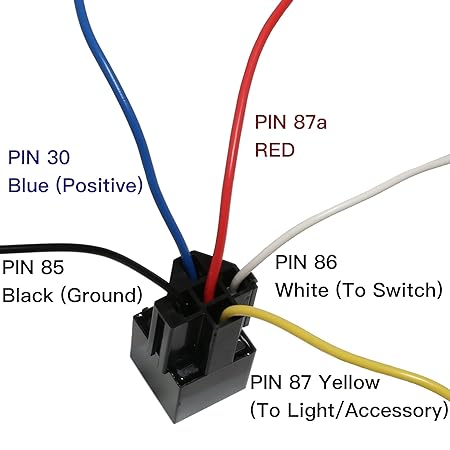
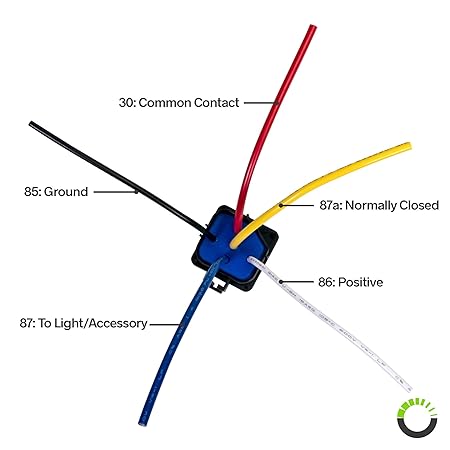
Wire Specifications: Black - Ground (85), Red - VDC (30), White - Trigger (86), Yellow - Output N/C (87a), and Blue - Output N/O (87).
Heavy duty 14AWG wires for the main contact and pre-wired with 6" pigtail leads.
User Manual available for download under Product Information Details
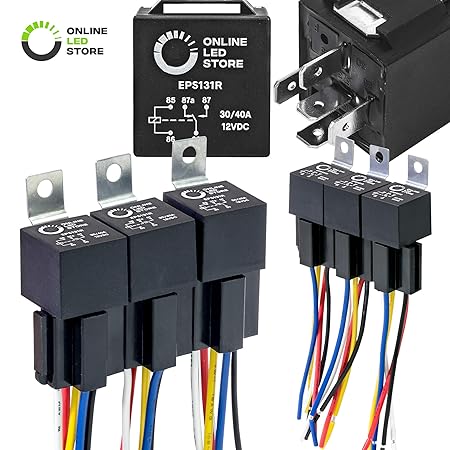
Bosch style 12VDC (14V Max) 5-Pin SPDT (Single Pole Double Throw) Relay with 40A/30A High Switching Capability.
$234
Everything on the relay set looks well-made. as an added bonus, comes in a lovely plastic box.The bottom of relays is sealed to keep moisture and water out, which could hasten the corrosion of the contacts.Although the 14 gauge wires on the supplied relay sockets are not sized for the full current rating, this is fine for the majority of applications these would be used for. It wouldn't be a good idea to make them with a heavy gauge by default because they would merely be more challenging to deal with. Instead of using the relay sockets, connect it directly to your wire if you truly need to switch the high currents.The grooves on the sides of the relay sockets allow them to interlock side by side. If you plan to remove the relay sockets later, use a tool knife to soften the edge of the male tongue so it won't lock in place. That makes it easier for it to slide back off.The mounting tabs are available in a separate bag for use if necessary; once clicked in, they will latch in pretty much permanently and need prying to try to remove. Since the center ones in a ganged layout might not be required, you could probably leave them off until you're ready to mount.The blue wire is the NO wire, yellow is the NC wire (Terminal 87a), and red is the COM wire (Terminal 30). (Terminal 87)The coil inputs, identified as 14V input, are white and black.The drop out voltage was about 3V, and the pull-in voltage was about 7.8V. Applying full coil voltage will drive the contacts together more forcefully and lower contact resistance, allowing for the NO contact to handle the most current. The normally open (NO) contact on terminal 87 measured at roughly 4.9 milliohms, while the normally closed (NC) contact on terminal 87a measured at 6.8 milliohms. At full loading, that translates to a 0.2V loss across the terminals. However, as they age and load, expect it to rise. If you consistently drive with a full load, it will begin to heat up and degrade more quickly until it fails. Measure the voltage drop when operating the load on a regular basis to look for marginal situations that might portend impending failure.Check your installation by measuring across the contact splices with your DMM set to the millivolt range. A broken relay, a bad relay, or just poor splicing could be the cause of any appreciable voltage readings across the closed loops. If the relay is utilized in a difficult location where it is exposed to moisture, some dielectric grease on the relay terminals will assist avoid the deterioration of the socket contacts over time.The socket crimps appeared good and uniform, and there were no obvious issues.Overall, a really attractive and practical set of relays.
4.6/5
12 V DC waterproof relay (max 14 V). 40 A / 30 A High switching capability
Nominal Coil Voltage: 12 V DC; Coil Power: 1.8 W; Coil Resistance: 80 Ω; Must Operate Voltage: 6~8 V DC; Must Release Voltage: 0.6~3.6 V DC; Maximum Applied Voltage: 15.6 V DC
16 AWG tinned copper wires for Pin 85, Pin 86. Length: 5.1 in
12 AWG tinned copper wires for Pin 30, Pin 87, Pin 87a. Length: 5.1 in
Excellent waterproof performance, high quality in any weather conditions
$234


I use it in a truck with water-resistant connectors, and it just works.I have a trigger device called a PAC TR7 (TR7 is programmed for feature 15, with a 3 input in 5 seconds, generating a 1 second output pulse to the relay).So, in the truck's cab, I flip a switch three times in five seconds, and the TR7 recognises that as an input and sends a one-second pulse to this relay. I added this relay so that a nice, strong current at 12 volts could be transmitted to the trunk release and its releases because the TR7 cannot supply the necessary current to drive a large trunk release.


4.6/5
Bosch style 4-Pin SPST (Single Pole Single Throw) Relay.
Built in fuse socket with included 30A blade fuse with heavy duty 14AWG wires for main contact.
12VDC (14V Max) and 30A High Switching Capability.
Set includes 6 relays, 6 relay harnesses, and 6 blade fuses.
Wire Specifications: Black - Ground (85), Red - VDC (30), White - Trigger (86), Blue - Output N/O (87).
$234
In order to convert my drag truck into a street weekend vehicle, I purchased a number of these 30 amps with fuses, 30 amps without fuses, 60 amps, and 80 amps. cheaper to purchase them here than at a nearby parts store. I have four ground wires that enter the body at various points. Dual fans, a water pump, a gasoline pump, and a transmission cooler located under the vehicle are power-related devices. Instead of simply grounding an object to the body like most people do, everything is on a ground wire that comes from a grounded wire. I like to ensure I have a solid foundation. Additionally, I want to confirm that there are 14 volts inside the truck cab at the ignition switch and electricity exiting from it when the engine is at idle. The switches operate for me without any issues.Aktuelles 10.26.2019Relays work without issues. So far, I haven't blown a fuse. There may be issues with some folks, Not a good ground supply, inadequate wiring, Amp draw at startup is greater than 30 amps. - When fans first switch on, their amp draw might be significant. On startup, you should verify the amp draw of each power source so you can match the relay to the available amps. I've got four ground wiring. I have two fans that each have a capacity of 2800 cfm, a 14-gp fuel pump, a water pump, and a trans fan cooler. My fans draw 32 to 35 amps each when they first start up before reducing their consumption to about 22 amps. Besides that, I just use 30amp relays. My amp draw is 68 amps at idle with the fuel pump, water pump, and trans cooler fan are all on. I hope this helps some of the people who are having issues. My wiring gauge is 10 on the rest and 8 on the front fans. The wire that came with it is not being used.
4.6/5
User Manual available for download under Product Information Details
Wire Specifications: Black - Ground (85), Red - VDC (30), White - Trigger (86), Yellow - Output N/C (87a), and Blue - Output N/O (87).
Waterproof construction & heavy duty 12AWG wires for the main contact.
Bosch style 5-Pin SPDT (Single Pole Double Throw) Relay.
12VDC (14V Max) and 40A/30A High Switching Capability.
$234


In order to reduce the current demand from the lighting switches in my 1970 MGB Roadster, I used four of these well-built relays. Excellent waterproofing is present (on the relays, that is). The black and white leads (ground and trigger, respectively) on these devices are reversible, according to some users. By taking out and switching the leads, this is quickly fixed. The wire can be gently pushed free by gently prying away a readily visible locking tab on the relevant relay socket terminal with a little flat-blade jeweler's screwdriver. After switching the wires, it will be easier to relock the terminal if you bend the small tab back. Similar to that, if necessary, the yellow lead (terminal 87a) can be removed, and the resulting hole can then be sealed with silicone sealant.
![ONLINE LED STORE Waterproof Relay/Fuse Block for Automotive and Marine [6-Slot Bosch Style Relay Holder] [6-Slot Blade Fuse Holder] [Silicone Seals] Fuse Box for Jeep Boat Car Or Truck](/i/81dZyTGdxuL/450/best-automotive-replacement-starter-relays.jpg)
![ONLINE LED STORE Waterproof Relay/Fuse Block for Automotive and Marine [6-Slot Bosch Style Relay Holder] [6-Slot Blade Fuse Holder] [Silicone Seals] Fuse Box for Jeep Boat Car Or Truck](/i/91KUmizu4oL/450/best-automotive-replacement-starter-relays.jpg)
![ONLINE LED STORE Waterproof Relay/Fuse Block for Automotive and Marine [6-Slot Bosch Style Relay Holder] [6-Slot Blade Fuse Holder] [Silicone Seals] Fuse Box for Jeep Boat Car Or Truck](/i/81-hM3xOUiL/450/best-automotive-replacement-starter-relays.jpg)
![ONLINE LED STORE Waterproof Relay/Fuse Block for Automotive and Marine [6-Slot Bosch Style Relay Holder] [6-Slot Blade Fuse Holder] [Silicone Seals] Fuse Box for Jeep Boat Car Or Truck](/i/81-nItEY0FL/450/best-automotive-replacement-starter-relays.jpg)
![ONLINE LED STORE Waterproof Relay/Fuse Block for Automotive and Marine [6-Slot Bosch Style Relay Holder] [6-Slot Blade Fuse Holder] [Silicone Seals] Fuse Box for Jeep Boat Car Or Truck](/i/81rx2h42r8L/450/best-automotive-replacement-starter-relays.jpg)
![ONLINE LED STORE Waterproof Relay/Fuse Block for Automotive and Marine [6-Slot Bosch Style Relay Holder] [6-Slot Blade Fuse Holder] [Silicone Seals] Fuse Box for Jeep Boat Car Or Truck](/i/81-2AgbmEWL/450/best-automotive-replacement-starter-relays.jpg)
![ONLINE LED STORE Waterproof Relay/Fuse Block for Automotive and Marine [6-Slot Bosch Style Relay Holder] [6-Slot Blade Fuse Holder] [Silicone Seals] Fuse Box for Jeep Boat Car Or Truck](/i/71cSdPbr0pL/450/best-automotive-replacement-starter-relays.jpg)
![ONLINE LED STORE Waterproof Relay/Fuse Block for Automotive and Marine [6-Slot Bosch Style Relay Holder] [6-Slot Blade Fuse Holder] [Silicone Seals] Fuse Box for Jeep Boat Car Or Truck](/i/81sEWJewtDL/450/best-automotive-replacement-starter-relays.jpg)
4.5/5
REMAP YOUR WIRING - organize, consolidate, and keep track of multiple independent circuits with six relay sockets and six fuse holders.
MULTI-TRERRAIN - Our unique "Z" shaped brackets make it possible to securely mount this waterproof relay box just about anywhere.
BUILT LIKE A TANK - Made from durable and dependable nylon 66 and sporting an IP65 waterproof rating, our relay box dosent understand the word "can't."
MORE THAN A WARRANTY - We've got you covered with an industry leading two-year warranty and the best customer support in the business.
A COMPLETE KIT - Box, brackets, seals, terminals, we've included everything you will need to sucessfully install your new waterproof relay box.
$234
If you haven't dealt with how relays work before, I advise searching up a relay diagram before making the box. Using this kit, it's quite simple to create your own DIY sPOD for a small fraction of the cost. A ready-made fused relay set-up would cost more than twice as much as the about $70 I paid in my relay and switch setup.I heartily advise it to Jeep owners on a tight budget.
4.5/5
Pin Specifications: Ground (85), VDC (30), Trigger (86), Output N/C (87a), and Output N/O (87).
40A/30A High Switching Capability.
Bosch style 5-Pin SPDT (Single Pole Double Throw) Relay
10pc Included
User Manual available for download under Product Information Details
$234


These showed up as promised.You get ten of these for the price of three if you look at the price.My 1995 Jeep Wrangler 2.5L has four installed, and all are performing better than anticipated.The relays I deleted, in my opinion, were the original relays.I was aware that one of them was starting to fail, but the engine is now considerably more stable.Attention: Although the metal tabs are detachable, installation was extremely difficult due to the narrow space that the tabs need to slide in on the relays.It would not have mattered if the extra width was on the opposite side.Fortunately, I was able to install them, and I don't think any of them will ever vibrate loose.However, if I ever need to take them out, I will need a screwdriver to pry them out.
![ONLINE LED STORE 12-Slot Relay Box [6 Relays] [6 Blade Fuses] [Bosch Style Relays] [Easy Installation] [OEM Factory Look] - Fuse Relay Box for Automotive and Marine Use](/i/81bG0rF8O%2BL/450/best-automotive-replacement-starter-relays.jpg)
![ONLINE LED STORE 12-Slot Relay Box [6 Relays] [6 Blade Fuses] [Bosch Style Relays] [Easy Installation] [OEM Factory Look] - Fuse Relay Box for Automotive and Marine Use](/i/81KAAtG5SuL/450/best-automotive-replacement-starter-relays.jpg)
![ONLINE LED STORE 12-Slot Relay Box [6 Relays] [6 Blade Fuses] [Bosch Style Relays] [Easy Installation] [OEM Factory Look] - Fuse Relay Box for Automotive and Marine Use](/i/81fsbrX8VDL/450/best-automotive-replacement-starter-relays.jpg)
![ONLINE LED STORE 12-Slot Relay Box [6 Relays] [6 Blade Fuses] [Bosch Style Relays] [Easy Installation] [OEM Factory Look] - Fuse Relay Box for Automotive and Marine Use](/i/81mqF0gglgL/450/best-automotive-replacement-starter-relays.jpg)
![ONLINE LED STORE 12-Slot Relay Box [6 Relays] [6 Blade Fuses] [Bosch Style Relays] [Easy Installation] [OEM Factory Look] - Fuse Relay Box for Automotive and Marine Use](/i/81PoAO5E5CL/450/best-automotive-replacement-starter-relays.jpg)
![ONLINE LED STORE 12-Slot Relay Box [6 Relays] [6 Blade Fuses] [Bosch Style Relays] [Easy Installation] [OEM Factory Look] - Fuse Relay Box for Automotive and Marine Use](/i/815Kpp3D0aL/450/best-automotive-replacement-starter-relays.jpg)
![ONLINE LED STORE 12-Slot Relay Box [6 Relays] [6 Blade Fuses] [Bosch Style Relays] [Easy Installation] [OEM Factory Look] - Fuse Relay Box for Automotive and Marine Use](/i/715vF9qXZSL/450/best-automotive-replacement-starter-relays.jpg)
4.5/5
VERSATILE MOUNTING OPTIONS- Since most modern vehicles have angular/sloping engine bays or trunk areas, we engineered the mounting legs to snugly adhere to these surfaces; a rubber spacer is also included so you can mount the automotive relay box on flat surfaces too.
INSTALLATION IS A SNAP- The Snap-Fit upper and lower cover cases allow easy access for relays, fuses, and wires.
ACCESSORIES INCLUDED- Metallic pins are included so you can effortlessly swap out relays and fuses from the back of the fuse relay box.
OEM-STYLE PROTECTION- Tidy up your vehicle's engine bay by securely stowing away your relays and fuses in this sturdy relay box for a clean factory look backed by unbeatable protection.
SUPPORTS RELAYS & FUSES- Safely stores up to (5x) Bosch Style 40/30A 5-Pin Relays/30A 4-Pin Relays (compatible with 0.25" Pins), (1x) RTT7121A 4-Pin Relay, and (6x) ATO/ATC Blade Fuses.
$234
If you want to have several lights or accessories in your car, this is a great tool. How I utilized it is in this review. I bought the relays with the pigtails for this box. The brass connectors are added and removed using the "catch and release" technique in this box. If you purchase relays with pigtails, you can take the wires out using connectors, bend the tabs back out, and then push the wires directly into this box. 30/40 AMP EPAuto Relay Harness Spdt 12V Bosch Style, 5 PackAdditionally, I installed bus bars to this box to accommodate all of the standard positive and negative connections.Common 100A 5-Gang Mini BusBar with Cover from Blue Sea SystemsAs soon as you get your relays, you need to remove the connector and wires. I did this by using a 2 mm jeweler's screwdriver. First, you push the wire further into the plastic connector, then you lever the screwdriver to flatten the tab down, and then you take the wire and connector out. After a few tries, you'll start to get good at this. The catch tab is then ready to be inserted into the box after being bent back out.To acquire the prewired leads, I had to cut off the clip holder and remove the metal clip from the relays I purchased.All of the connectors I added were then soldered on after crimping.5 relays of one style and 1 relay of another are present in this box. I never protected my switches with that other relay; instead, I fused them.Additionally, the center connection on these relays is usually hot, so I eventually pulled the wire from that connection because I didn't need it.Just be careful to locate a suitable location to mount the box. The most challenging aspect of my 2017 Jeep installation was locating a practical location to mount the box.
4.3/5
16 AWG tinned copper wires for Pin 85, Pin 86. Length: 5.1 in
12 AWG tinned copper wires for Pin 30, Pin 87, Pin 87a. Length: 5.1 in
12 V DC waterproof relay (max 14 V). 40 A / 30 A High switching capability
Excellent waterproof performance, high quality in any weather conditions
Nominal Coil Voltage: 12 V DC; Coil Power: 1.8 W; Coil Resistance: 80 Ω; Must Operate Voltage: 6~8 V DC; Must Release Voltage: 0.6~3.6 V DC; Maximum Applied Voltage: 15.6 V DC
$234

In order to recreate the original locker detect switch, I had to update the axles on my Jeep Rubicon. This is how I plugged it into the circuit: when I switch on my lockers, the relay closes, signaling to the Jeep that the locker is on. By doing this, the blinking locker light issue is resolved, and the dash light is now solidly lighted. The relay makes a very simple repair. To prevent the wires from failing due to bending forces, I attached the relay next to the axle, covered the wires with wire loom, and fastened everything to the original wiring harness using zip ties.This relay appears to be well made and to have a long lifespan. The cables could be longer, 12 inches would be ideal, in my opinion, to allow me to counterbalance the watertight splices I used. I concur with another reviewer. When the need arises, I'll place another order.
If you think a relay may be bad, there are a few tests you can perform to check its condition. First, check for continuity between the relay's terminals using a multimeter. If there is continuity, the relay is good. If there is no continuity, or if you're not sure, you can also check for resistance. To do this, disconnect the relay from the circuit it's in and measure the resistance between the relay's terminals. A good relay should have a resistance of about 30 ohms. If the relay has a resistance
If your car won't start, one possible cause is a failed starter relay. Here's how to check if your starter relay is working: 1. First, check the fuse for the starter relay. If it's blown, replace it and try again. 2. If the fuse is good, then use a multimeter to test the continuity of the starter relay. If there is no continuity, then the starter relay is likely defective and needs to be replaced.
If a relay fuse is blown, it can be difficult to tell without a multimeter. However, there are a few signs that may indicate a blown fuse, such as a clicking noise when the relay is activated, or the relay may not activate at all. If the fuse is blown, it will need to be replaced.
If your car won't start, it could be either your starter or your ignition switch. Here's how you can tell the difference: If your car makes a clicking sound when you turn the key, it's probably your starter. If your car makes a grinding sound, it's probably your ignition switch. If your car won't start and you can't hear any noise at all, it's probably your ignition switch. If you're not sure, the best way to tell is to have a mechanic check it out.
Car relays are typically not very expensive, costing around $5-$30. However, the price will depend on the make and model of the car, as well as the specific relay needed. It is best to consult a mechanic or car dealership to determine the exact price.
A starter relay typically costs between $15 and $30. The cost will vary depending on the make and model of your car.
COPYRIGHT © 2019


